

The Backyard Beet: Corral These Big Three Elements to Achieve Gardening Success
by
Chris Mattingly, for the Shuttle
When I founded my hatchback-based, full-service food gardening company five years ago, my main goal was to share the magic of homegrown food with my clients.
I wanted to make their garden goals simple and effortless to achieve. With welcoming, attractive beds of plants growing themselves, I figured every home would have their own portal to the beauty and wonder of the natural world, and experience a sense of connection to their food and surroundings. I believed that the personal transformation that comes from that experience would prove valuable enough to justify the cost of hiring professional help.
But when I started gardening for other families, I learned that discovering a “simple and effortless” way would take a lot of work. For my first clients (fortunately, they were family friends), I put together a few beds with new soil and planted lettuce, herbs, peppers, tomatoes, and other vegetables.
When I visited two weeks later (in July), I got my first lesson in how to kill a garden. The soil was too dry, the irrigation nonexistent, and the fencing far from secure. A groundhog had feasted on large swaths of the garden, and what was left was burnt to a crisp. I still remember feeling and hearing the crunch of young beet leaves as waves of disappointment washed over me.
Fortunately, I was at the beginning of a great journey. I figured if I could solve these problems and more, I could help many others enjoy season after season of success in their garden.
Here are three elements of the vegetable garden that can’t be overlooked. They’re important to get right if you’re designing a new garden, and worth looking at if your existing garden has offered more frustration than inspiration.
Soil
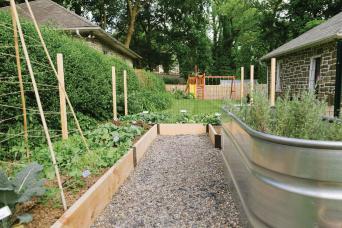
Raised beds can’t be beat for the ease of controlling the exact makeup of your garden soil or growing medium. By building up, you are avoiding any damp or poorly drained soils that would otherwise suffocate plant roots. You’re also avoiding the need to dig, test, or modify any of the soil on your property. The new beds and layer of new soil (at least six inches thick) can go right on top of grass.
New soil has its pitfalls, too. Bagged potting soil typically offers a light and free-draining medium that works great for pots, but might lose water too quickly. Adding compost will help find the right balance between keeping moisture around and draining excess water.
For our gardens, we use a combination of compost, topsoil, and organic coconut coir. The blend is adjusted according to the sun exposure; gardens in full sun require more moisture retention, while those in shadier or better protected spots require better drainage.
Many of our customers come to us with a garden that’s been around for years, or with a garden they inherited when they bought their house. For existing gardens, there’s a likelihood that plant diseases are happily inhabiting the soil.
Soil-borne diseases develop over time as plants from the same families are grown in the same spot year after year, especially in heavy, high-moisture and nutrient-deficient soils. The evidence is in the poor performance and early death of plants. Vining tomatoes, for example, should produce fruit through October, and often even part of November. Many gardeners with lots of experience have come to accept that tomatoes are “done” by September, but they’re only done because they’ve been done in by disease.
The cure for diseased soil is to replace it. This may seem drastic, but it’s the only reasonable alternative compared to putting time, money and effort into a garden that won’t give back.
Finally, we add compost to our gardens every year in December. It’s never a bad time to add compost! Less serious soil and disease problems can be helped or solved by the addition of a layer of compost. Don’t mix it in; lay it like a blanket across the garden.
Irrigation
Watering the garden is a lovely experience, but I would urge you to make hand watering optional. Instead, set watering on auto and visit with your precious plants without a hose in hand. Practice the art of mindful observation, looking closely at each plant to discover its secrets. After all, the best fertilizer is the gardener’s shadow.
Automated drip irrigation is a surprisingly attainable feature, even for the DIY gardener. For the automated part, choose a battery-operated timer with the simplicity of an old school alarm clock, or a battery-operated timer with Wi-Fi and a smartphone app. In either case, the timer is screwed onto the hose bib, and drip irrigation tubing carries water to the garden, where smaller tubes distribute the water evenly across the soil. For more detailed guidance and pre-built kits, visit Drip Depot’s website (www.dripdepot.com).
Be wary of overwatering — excess moisture for a prolonged period leads to a lack of oxygen for soil microbes and plant roots. Start low and adjust watering up as you notice some plants beginning to wilt. Note that cucumber leaves will appear wilted in excess heat, regardless of the soil moisture.
It’s important to adjust for any significant rainfall events. While the Wi-Fi timers reduce watering to adjust for rain, other timers will require you to manually press a rain delay button.
Fencing
The most common critter concerns in our area, in order of threat level, are rabbits, dogs, deer and groundhogs. Birds, squirrels and chipmunks are in a class of their own because they’re impossible to keep out unless you build a “garden house,” a wood-framed structure covered in hardware cloth. It’s a peaceful and protected space where humans and berries alike can thrive.
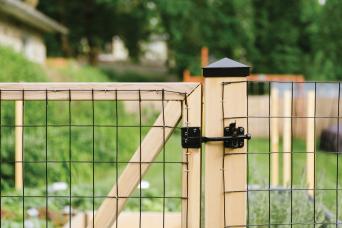
We use coated wire with 2” x 3” openings for our fencing.
Rabbits can be kept out with an 18-24” fence. Pet dogs will vary with size and age. In most cases, rabbit and dog fences can be installed along the borders of the beds. That way, you can lean over the fence to pick and maintain plants.
For deer and groundhogs, you’ll need a fence that goes around an area larger than the beds. There are an endless number of layout options, depending on your goals.
We use a five- or six-foot fence for deer and groundhogs. Deer can jump higher but are less likely to when the space to land is small and interrupted. Groundhogs exploit any irregularity in the ground or fencing near the ground to sneak underneath. For that reason, we always tie the fencing into a border or lay a piece of 12-inch wide fencing on top of the grass to secure it.
Almost everyone overlooks a groundhog’s impressive climbing ability. I’ve spent many a sleepless night trying to devise a plan to keep those voracious eaters from climbing my fences. I settled on tying the fencing to posts below the top 12 inches of the fence, so if a climber were to reach that height, they would fall backward. I don’t know if it works like a Road Runner cartoon, but I sure hope it does!
These elements can make the difference between a garden that makes you crazy and one that’s successful. If you would like help achieving your garden goals, we have a team of brilliant gardeners and builders for that purpose. To learn more, visit our website and book a consult online.
Chris Mattingly is the founder of Backyard Eats, a full-service food gardening business with an array of offerings in the greater Philadelphia area. Email him at chris@backyard-eats.com or visit www.backyard-eats.com.